Square headlights are better.
This
is dedicated to the story of my 89 YJ.
This is my first Jeep. I bought
it from a family member for $500. It
wasn’t running when I got it… but I figured it would be a fun project.
I
brought it home on July 1st, 2003. Here
is a pic…. It also came with full hard doors and a
hard-top.

Cost
me $300 for the tow dolly from
I
got it home, and looked over the receipts for the jeep. It was apparent that the previous owner had
replaced the tank, fuel pump, lines, cap, rotor, wires, plugs…etc… so I figured
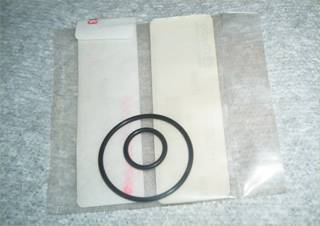
there had to be something wrong with the fuel injectors. Sure enough, it was just the little O-rings
above and below the injectors. Someone
had taken it apart at some time and put them in wrong. I put them in according to my Haynes manual
and off I went.
Can
you believe they charge $16 for these little O-rings? $816 Jeep.


There
was oil all over the engine, so I pressure washed it and changed out the valve
cover gasket. After about 30 miles, I
saw where the “other” oil leak was coming from…. The timing cover
to oil pan mating area. So I pulled the
front grille for better access, radiator, and ripped off the timing cover, pan,
water pump, and t-stat housing. Going to
do a full re-seal and install a new water pump and T-stat. $850 Jeep.

I
also repainted the brake master cylinder cover.
The only real bling so far! $853 Jeep.

I
have been noticing a fuel smell around the car, so I pulled the gas tank. Whoever installed it, crushed the vent lines,
so they were leaking at the rollover valve.
The rollover valve boot has a big tear in it too, so that probably where
the fuel smell is coming from…. It was never reaching the charcoal
canister. When I got the tank out, I
also notice that someone had lost the rubber pad that protects the tank from
rubbing on the gas tank skid plate…. And the new gas tank was already rusting
at the contact points because of this.
So, off I go sanding and painting the tank and skid plates! I went to Wal-mart,
and picked up a few sheets of self-adhesive foam rubber sheets, and I cut these
into 1.5” strips. Then I will attach
these to the inside of the skid plate.
Cost me $1.50 for the foam rubber sheets! $855 Jeep.

I
got some wheels and bumpers from a few fellow jeepn.com’ers. Cant wait to get
them on! Biggest
expense yet…. $1230 Jeep. Ouch!

So,
as of right now…. It’s all taken apart.
I am waiting on some gasket sets to come in for my timing cover, and all
the paint to dry…. And I should begin putting it back together in a week or so!
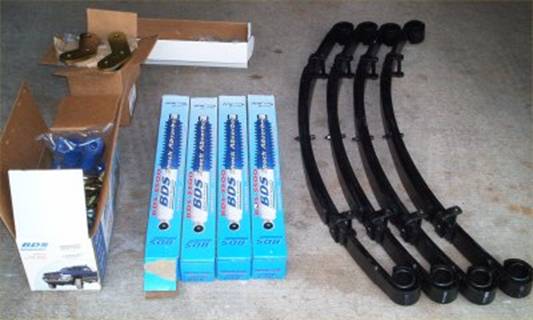
Next
on the list…. A bikini top, tires, and I am thinking about a 2.5” Skyjacker
lift with hydros. It also needs a floorpan
in the drivers side… it’s a flintstone-mobile right
now if I take the carpet out!

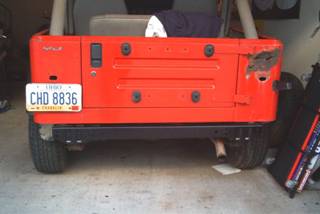
Primed
and painted smashed rusty fenders, after I beat them back out a little. $1450 Jeep.


July 28, 2003:
Installed grill, radiator, and shroud. Installed belts,
alternator. New radiator hoses
top and bottom. Filled it with oil,
water, and put 5 gallons of fuel in her.
Wont start! L $1492 DEAD Jeep.
July
29, 2003: Well, I
kept tracing the primary 12V+ wire from the pump, and sure enough, found a
short. I patched in a new segment of
primary wire, and it cranked right up!
No charge!
July
30, 2003: Took it for
it’s first road trip since the teardown, to the JNT Sonic cruise-in. Ran great all the way, but died on me about a
block from my house on the way home. Got
a tow into my parking lot, let it sit for about 20 minutes, and then tried it
again, and it cranked right up. Damn
this thing! I checked voltage to the
harness at the pump, and it is getting juice.
So now I suspect fuel pump or wiring between pump and harness.
I
tried to get the front bumper off, but one of the T55 torx heads stripped
because it was so rusted. I had to grind
the head off, and the nut broke free from it’s
tack-weld. Got to find
someone with a little welder to tack a new nut on there. While I was there, I sanded the front frame
areas and crossmember, and painted the entire area
with a rust-converting primer. It works
pretty good!
Started
on the drivers seat.
The sliders for the seat frame are busted, and had the wrong sized bolts
holding it together. It swivels left and
right a few inches because of this, and was really annoying while driving
around. I need to get a new seat slider
or try and get this one welded up with new bolts.
Aug
15, 2003: Jeep has
been running great, driving it to work and back every day. Replaced the gas cap. Still smelling fuel on a full tank, and now I
noticed the top of my tank is wet, and I am leaking fuel on turns. Something must not be right where the fuel
pump assembly mounts into the tank, so I gotta pull the tank again. L I will wait till I install the body lift, so
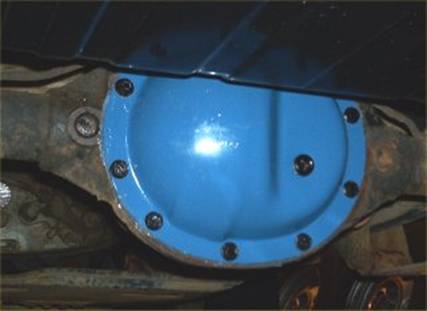
it will be easier and have more room. I
pulled the diff cover, and painted it.
Cleaned the crap out of the rear end, and getting ready to re-assemble
when all the paint dries. Been soaking
all the suspension in PB blaster, anticipating my lift installs. $1500 Jeep.


Here are a few more current pics:
http://www.advantexcom.net/~quino/jeep2/YJ1.jpg
http://www.advantexcom.net/~quino/jeep2/YJ2.jpg
http://www.advantexcom.net/~quino/jeep2/YJ3.jpg
http://www.advantexcom.net/~quino/jeep2/YJ4.jpg
http://www.advantexcom.net/~quino/jeep2/YJ5.jpg
“The” list:
Some done…. Some to-do.
1. Replaced injector O-rings
2. Replaced throttle body base gasket
3. Replaced valve cover gasket
4. Removed, sanded, painted gas tank and skid. Install new bolts.
5. Tweaked fuel tank sending unit so it reads “more”
properly.
6. Sanded and painted rear frame bumper attachment.
7. Beat out dented front fenders. Sanded and painted front fenders.
8. Re-sealed oilpan and timing
cover
9. Replaced motor mounts and tranny mount.
10. Replaced gas cap.
11. Repainted brake MC cover.
12. Removed, painted, and reinstalled thermostat housing
with a new thermostat
13. Removed old water pump. Painted, then installed new pump.
14. Installed fuel pressure Schrader valve on throttle
body.
15. Installed new interior light bulbs in Tach and Speedo.
16. Replaced several fuel pump wires, and repaired main
engine wiring harnesses connections.
17. Replaced broken and aged vacuum lines.
18. Replaced PCV valve.
Cleaned oil out of airbox.
19. Painted bellhousing
dust-cover. Painted harmonic balancer.
20. Replaced top and bottom radiator hose.
21. Repaired fuel return line back to stock condition
22. Welded/repaired drivers seat frame.
23. Painted brake drums
24. Replaced all fuel vent lines from tank to canister.
25. Flushed and refilled rear differential fluid. Sanded and painted rear diff cover.
26. Removed and pitched beat-up stock bumpers.
27. Added lock washers to starter bolts (they were too
long and not seating properly)
28. Cleaned 4WD front axle actuator, cleaned all the
vacuum lines and fittings.
29. Installed bikini top.
30. Replaced left headlight.
31. Replaced left taillight.
32. Replaced wiper blades.
33. Installed Alloy wheels and new 31x10.5” tires.
34. Installed black tube bumpers front and rear.
35. Installed 2” suspension lift.
36. Installed new shocks and steering stabilizer.
37. Installed MORE boomerang shackles.
38. Install 1”body lift and new tub body mounts.
39. Installed Teraflex quick
disconnects on the sway bar.
40. Removed front and rear trackbars.
41. Install CB and antenna
42. Installed off-road lighting
43. Cut out rust in rear body corner. Cover with diamond plate covers.
44. Replace front brake calipers, flush brake fluid.
45. Install center console and some kind of decent stereo
system that wont just get stolen.
46. Clean engine internally and change oil.
47. Change all fluids in tranny, transfer case, and
rear-end.
48. Get some RXP gas treatment
49. Pray it will pass emissions inspection!